

Render blocking resources are files, typically CSS (Cascading Style Sheets) and JavaScript files that can slow down the rendering of a web page.
Users may perceive your website as slow and unresponsive, and this can negatively impact their perception of your organization or business.
Slow-loading websites can also lead to higher bounce rates, where visitors leave the site before it fully loads, which can affect your website’s engagement metrics and even SEO rankings.
What are render blocking resources?
Loading process of a website
Before we take a close look at render-blocking resources, we need to understand the normal loading process of a website is crucial for addressing render-blocking resources and optimizing overall performance.
the browser translating the URL into an IP address.
Making an HTTP request to the web server, parsing the HTML code from top to bottom.
Handling render-blocking resources like external CSS and JavaScript files. Applying CSS styles, executing JavaScript, constructing the DOM, and rendering the visible content.
Render blocking resources
When your website contains render-blocking resources, it loads certain files at the beginning of its code. This causes visitors to experience delays as they have to wait for these files to be processed before the page’s content becomes visible to them.
How to Test If Your Website Has Render-Blocking Resources?
Testing, if your website has render-blocking resources, involves identifying the files that might be causing delays in page rendering.
There are various online tools that can analyze your website’s performance and identify render-blocking resources.
Some popular tools include:
- Google PageSpeed Insights
- GTmetrix
- Pingdom Website Speed Test
Page Speed Testing Tools
You can use a tool like Google’s PageSpeed Insights.
This can give you detailed reports on your page performance and provide suggestions to help you improve your scores.
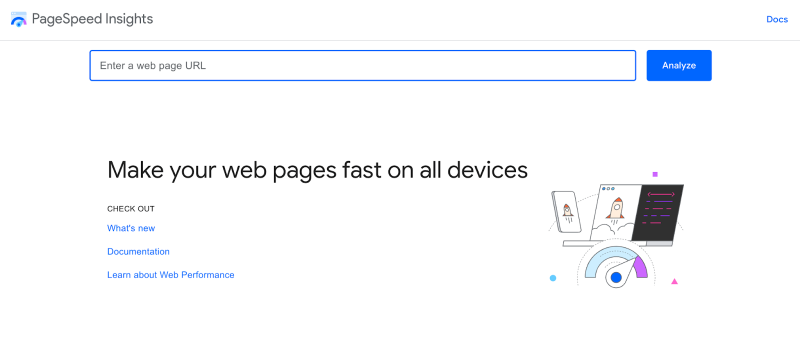
Enter your site’s URL in the search box and click Analyze
After the analysis is finished, you’ll be presented with performance scores for both the mobile and desktop versions of the webpage.
Diagnose Performance Issues
Google PageSpeed Insights provides a score for each of the following distinct categories:
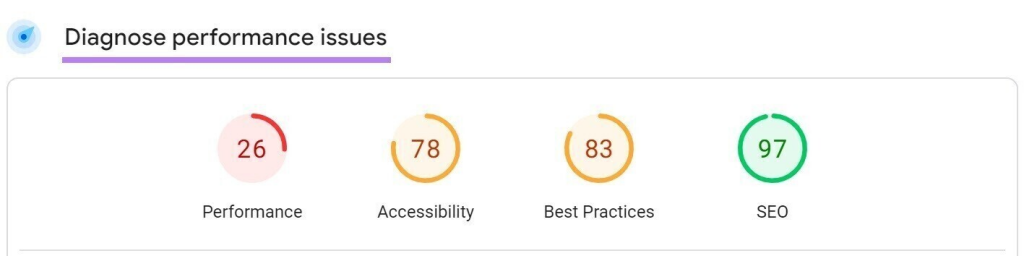
- Performance: This category presents an overall score that reflects your webpage’s performance, encompassing factors such as speed and resource optimization.
- Accessibility: It evaluates elements like proper HTML structure, alt text for images, keyboard navigation, and color contrast.
- Best Practices: This involves considerations like employing up-to-date web technologies, maintaining secure connections (HTTPS), utilizing clean and structured code, and avoiding common development pitfalls.
- SEO (Search Engine Optimization): It evaluates components such as meta tags, heading structures, structured data (schema markup), and mobile-friendliness. Effective SEO practices can contribute to higher search engine rankings.
Understanding the PageSpeed Insights Report
Core Web Vitals: These are important metrics identified by Google to measure the quality of user experience on websites.
They focus on how quickly a page loads, how smoothly it responds to user interactions, and how stable its content is while loading
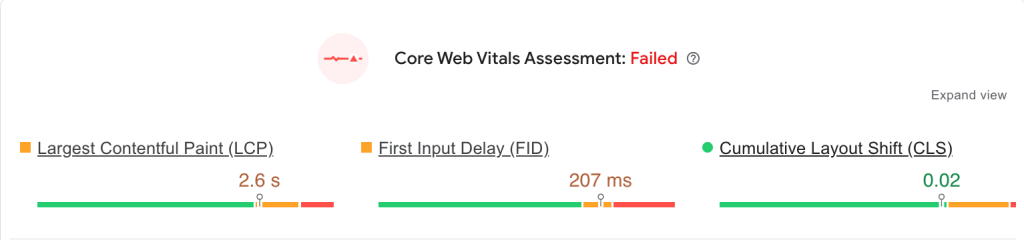
Largest Contentful Paint (LCP) This measures how long it takes for the largest image or text block on a page to appear..A score of 2.5 seconds or less is good.
First Input Delay (FID) or Interaction to Next Paint (INP): Measures interactivity. This gauges how quickly a page responds when a user clicks a button or link. A score of 100 milliseconds or less is good.
Cumulative Layout Shift (CLS): Measures visual stability. This quantifies how much page content shifts unexpectedly during loading, which can be annoying for users. A score of 0.1 or less is good.
Opportunities
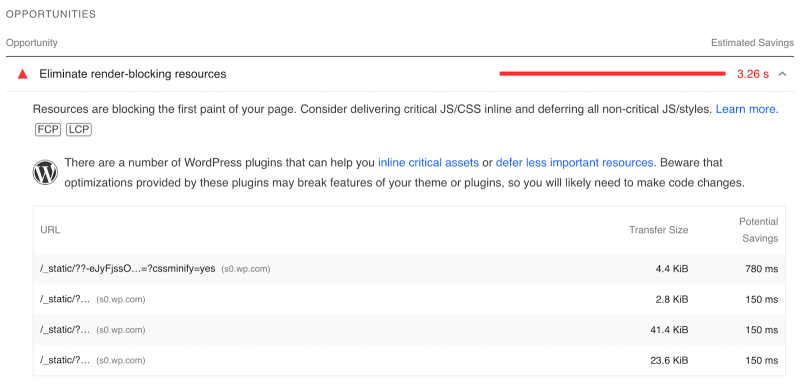
Additionally, you’ll receive a list of suggestions and recommendations to enhance the page’s performance.
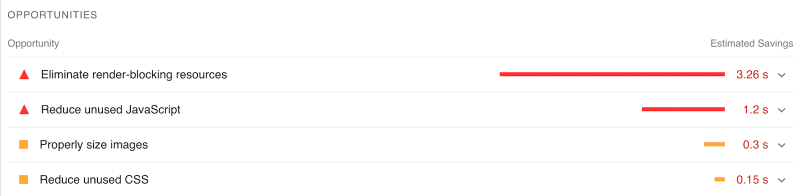
When you click on the analysis results, PageSpeed Insights will provide you with a list of resources that are causing your page to load more slowly.
These resources are known as “render-blocking resources.” On the right side of the page, you’ll find an estimate of the benefits you could gain if you decide to remove or delay these files
After pinpointing the render-blocking resources that are slowing down your website, you can take proactive steps to eliminate them from your site.
How to eliminate Render-Blocking Resources
Types of render blocking resources
As a general guideline, browsers consider all content within the <head> section of an HTML page as render-blocking. This encompasses:
- CSS stylesheets
- JavaScript files included within the <head> section
- Fonts fetched from either a Content Delivery Network (CDN) or a local server
- HTML imports
In contrast, resources like images, media files, and <script> tags placed at the bottom of the <body> section are categorized as non-render-blocking.
The @import rule and the <link> tag
You can add CSS to a webpage using one of two methods:
- Use the
<link rel="stylesheet">tag, which you should include in your HTML file. - Use the
@importrule, which you should include in your CSS file.
Although the @import rule keeps your HTML file cleaner and allows you to centralize all your CSS dependencies, it’s not the best choice in terms of performance.
The @import rule allows you to import CSS from other stylesheets, but this slows down the browser’s processing of your CSS file because it also needs to download the imported files. During this process, the rendering of the page is delayed.
If you plan to add more than one CSS file to your page, you have the option to use the <link> tag or concatenate the files using minification and bundling tools. This can help enhance page loading performance.
In general, using the <link> tag to link your external CSS files is recommended due to its performance benefits and the ability to load resources in parallel.
Defer non-critical CSS
Placing CSS files in the <head> section of your HTML page causes them to slow down page rendering. However, not all the CSS is needed to show the top part of your page.
To address this, you can split your CSS into essential and non-essential parts.
This technique, known as critical path optimization, is particularly helpful for boosting Core Web Vitals scores like Largest Contentful Paint (LCP).
Fortunately, you don’t have to manually identify your critical-path CSS – although that is possible.
Online tools, like the Critical Path CSS Generator or Addy Osmani’s Critical library, are available to extract the CSS rules related to your above-the-fold content.
For instance, the Critical Path CSS Generator generates two downloadable CSS files,one “critical” and one “combined.”
- You can incorporate the critical CSS file externally within the
<head>section, or you can inline it using the<style>tag to minimize HTTP requests.
- The combined CSS file contains all your CSS rules, and it should be placed before the closing
</body>tag, making it a non-render-blocking resource.
Use the defer and async attributes to eliminate render blocking JavaScript
Just like CSS, when you put JavaScript files in the <head> section, they can slow down your home page. But you can improve this:
Instead of putting <script> tags in the <head>, place them just before the closing </body> tag.
This way, they won’t slow down the initial page display. However, this might cause some parts of your website, like ads or animations, to load a bit later, especially if the scripts are big.
This can make your site seem slow, which isn’t great for users.To fix this, you can use the defer and async attributes with the <script> tag. These attributes help make sure your scripts don’t block the page from showing up:
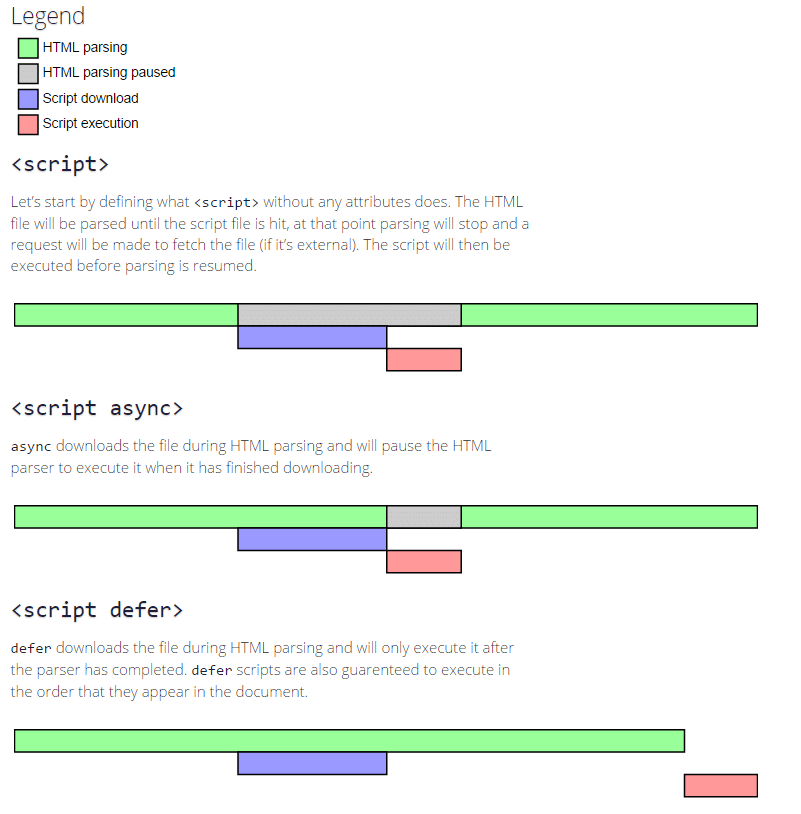
- The
deferattribute tells the browser to download the script without stopping the page from appearing. The script will run after the page’s main content is ready.
<!DOCTYPE html>
<html>
<head>
    <title>Deferred Script Example</title>
</head>
<body>
    <h1>Hello, World!</h1>

    <script src="script.js" defer></script>
</body>
</html>
In this example, the script.js file will be downloaded in the background while the browser continues to parse and render the HTML content. The script will be executed after the DOM is ready.”DOM” stands for “Document Object Model.” It is a programming interface provided by web browsers that allows scripts to interact with the content and structure of an HTML document
- The script is downloaded in the background and executed as soon as it’s available. It doesn’t block the parsing of the HTML document, but it might not wait for the DOM to be fully constructed before execution.
<!DOCTYPE html>
<html>
<head>
    <title>Async Script Example</title>
</head>
<body>
    <h1>Hello, World!</h1>

    <script src="async-script.js" async></script>
</body>
</html>
In this example, the async-script.js file will be downloaded in the background while the browser continues to parse and render the HTML content. The script will be executed as soon as it’s downloaded, regardless of whether the HTML parsing is complete or not.
Remove unused CSS and JavaScript
it’s also a good idea to check if you have any unused CSS or JavaScript on your site.Tools like PurgeCSS can help with this by scanning your CSS code and getting rid of selectors that you don’t use, even those from frameworks like Bootstrap.
Split code into smaller bundles
You can use tools like Webpack, Rollup, and Parcel to break your code into smaller parts and load them when needed.
These smaller parts can be loaded after the main page is shown, saving time. You might also have code that only needs to load when a user wants to use a specific part of your page.
Minify CSS and JavaScript
You can make your website even faster by shrinking both the resources that slow down the initial display and the ones that don’t. Smaller files load quicker, making your site show up faster.
This also speeds up downloading the non-delaying resources in the background.
Various tools, like Minify, CSS Minifier, Minify Code, and PostCSS, can help you with this.
Additionally, common build tools such as Webpack, Parcel, and Rollup have features built in to shrink the size of the resources that affect the initial display.
Load custom fonts locally
Custom fonts are usually fetched from the <head> section of your webpage, making them render blocking resources. Here’s how you can optimize the impact of custom fonts on initial page loading:
Rather than getting fonts from a content delivery network like Google CDN, consider adding them locally. This helps because font providers often include multiple @font-face rules, many of which aren’t necessary for your site.
How to Eliminate Render-Blocking Resources with WordPress Plugins
If your website is hosted on WordPress, utilizing a plugin can simplify the process. There are several well-known plugins available to assist with minifying CSS and JavaScript.
These plugins offer features for optimizing your site’s performance. Examples of such plugins include Hummingbird, LiteSpeed Cache, Autoptimize, JCH Optimize, JCH Optimize, WP Rocket and W3 Total Cache.
Here’s how to use a plugin to minify your code:
- Access your WordPress admin panel and navigate to the dashboard menu.
- After logging in, locate and click on the “Plugins” option within the dashboard menu.
- To install the plugin, click on the “Add Plugin” button and then proceed to click “Activate” once the installation is complete.
- Once activated, you will find the plugin option in the dashboard menu. Follow the prompts of the setup wizard to complete the initial configuration.
Mastering WordPress SEO: A Comprehensive Tutorial for Beginners to Advanced Users (2023)